- Back to Home »
- How to Build a Pole Barn with Insulated Panels

Pole barns, renowned for their versatility and cost-effectiveness, offer a practical and durable solution for a wide range of applications. Integrating insulated panels into the construction elevates the structure's functionality and energy efficiency, making them ideal for workshops, garages, agricultural storage, and even residential living spaces. This comprehensive guide provides a detailed roadmap for building a pole barn with insulated panels, encompassing every step from planning to completion.
1. Planning and Preparation:
a) Design and Layout:
Purpose and Functionality: Clearly define the intended use of the pole barn. This will guide decisions regarding size, layout, and structural requirements. For example, a workshop will need ample floor space and potentially specialized electrical wiring, while a storage barn may prioritize maximizing storage capacity.
Site Assessment: Thorough site evaluation is crucial. Consider factors like terrain, soil conditions, access roads, and proximity to utilities. Ensure compliance with local building codes and zoning regulations.
Structural Engineering: Engage a qualified structural engineer to design a plan incorporating the specific load requirements for your chosen purpose. The engineer will determine pole spacing, foundation type, and overall structural integrity.
Architectural Design: Consider the aesthetic appeal of your pole barn. Architectural elements like roof pitch, window placement, and exterior cladding can significantly influence the final look.
b) Material Selection:
Pole Materials: The most common options include pressure-treated wood, steel poles, and concrete poles. Pressure-treated wood offers affordability, while steel and concrete provide greater durability and resistance to pests and rot. Choose the option that best suits your budget and requirements.
Insulated Panels: These panels are available in various materials, including:
Foam Core: Lightweight and cost-effective, offering good insulation properties.
Fiberglass Reinforced Plastic (FRP): Strong and impact-resistant, suitable for areas prone to harsh weather conditions.
Polyurethane: Excellent thermal insulation and moisture resistance, suitable for a wide range of applications.
Metal: Durable and fire-resistant, often used for industrial and commercial buildings.
Roofing Materials: Popular options include metal roofing, asphalt shingles, and concrete tiles. Consider factors like durability, cost, and aesthetic preferences.
Doors and Windows: Select doors and windows that meet your specific needs for functionality, size, and insulation performance.
2. Site Preparation and Foundation:
Clearing and Grading: Clear the site of vegetation, debris, and any obstacles. Grade the area to achieve proper drainage and create a level foundation.
Foundation Construction: The foundation type will depend on the soil conditions and the weight of the structure. Options include:
Concrete Piers: Cost-effective and suitable for lighter structures on well-drained soil.
Concrete Footings: Stronger and more stable, suitable for heavier structures or areas with challenging soil conditions.
Concrete Slab: Provides a solid, level surface for the floor, suitable for workshops or living spaces.
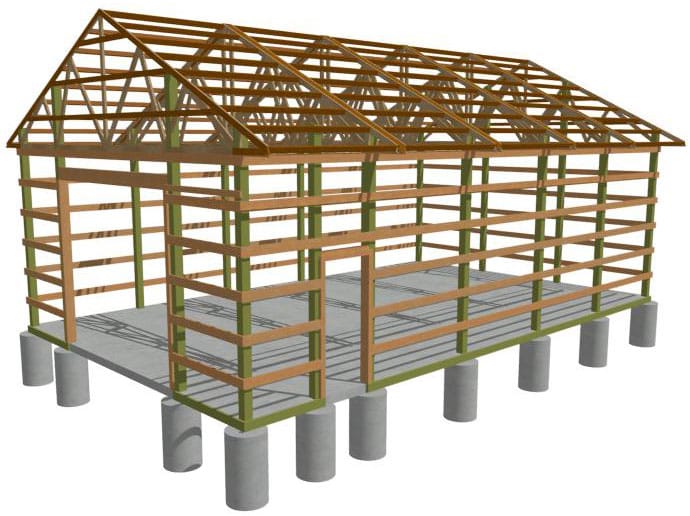
Pole Installation: Position the poles according to the structural engineer's plan. Securely embed them in the foundation using concrete or specialized anchors.
3. Erection of the Pole Barn Frame:
Framing: Construct the frame using lumber or steel beams according to the engineer's specifications. Use appropriate fasteners and connectors for secure and durable connections.
Rafter and Truss Installation: Install the rafters or trusses to support the roof structure. Ensure proper spacing and alignment for optimal strength and load distribution.
Sheathing and Roofing: Apply sheathing panels to the roof frame, providing a base for the roofing material. Install the roofing system, adhering to manufacturer's instructions for optimal performance.
4. Insulated Panel Installation:
Panel Preparation: Measure and cut the panels to the desired dimensions, ensuring precise fit and minimizing waste.
Installation: Use specialized clips or fasteners designed for insulated panel attachment. Ensure proper alignment and consistent spacing for optimal performance and aesthetic appeal.
Flashing and Sealants: Apply flashing around windows, doors, and other penetrations to prevent water intrusion. Seal any gaps or joints with weatherproof sealants to maintain insulation integrity.
5. Finishing Touches:
Interior and Exterior Cladding: Apply interior and exterior cladding as desired, ensuring a smooth and aesthetically pleasing finish.
Door and Window Installation: Install doors and windows according to the manufacturer's guidelines, ensuring proper alignment and sealing.
Electrical and Plumbing: Install electrical wiring, plumbing lines, and other utilities as required, adhering to local codes and regulations.
Final Touches: Complete the project with final touches like painting, staining, or other decorative elements to enhance the appearance and protect the structure.
6. Maintenance and Care:
Regular Inspection: Periodically inspect the structure for any damage or deterioration, addressing issues promptly.
Cleaning and Maintenance: Maintain the exterior and interior surfaces by regularly cleaning and applying appropriate protective coatings.
Insulation Integrity: Monitor the condition of the insulated panels and address any damage or degradation to maintain energy efficiency.
Benefits of Insulated Panels:
Enhanced Energy Efficiency: Insulated panels significantly improve thermal insulation, reducing energy consumption for heating and cooling.
Cost Savings: The improved energy efficiency leads to lower utility bills over time, offsetting the initial investment cost.
Moisture Control: The panels resist moisture penetration, preventing damage from condensation and improving the longevity of the structure.
Sound Reduction: Insulated panels provide excellent sound insulation, creating a quieter and more comfortable environment inside the pole barn.
Versatility: Suitable for a wide range of applications, from workshops and garages to agricultural storage and even residential living spaces.
Conclusion:
Building a pole barn with insulated panels offers a combination of cost-effectiveness, durability, and energy efficiency. By carefully planning, selecting suitable materials, and following proper construction techniques, you can create a versatile and functional structure that meets your specific needs for years to come. Remember to consult with professionals for structural engineering and design guidance to ensure a safe and efficient construction project. With proper maintenance and care, your pole barn will serve as a valuable asset for years to come.


